Removing Anchor Fixings: What You Need to Know
Anchor fixings are a common method of securing heavy machinery, equipment, and fixtures to concrete surfaces. However, anchor fixings may become damaged or need removal due to relocation or renovation of the structure. Removing anchor fixings requires the use of the correct tools and techniques to avoid potential hazards. This article will provide a step-by-step guide on how to remove anchor fixings.
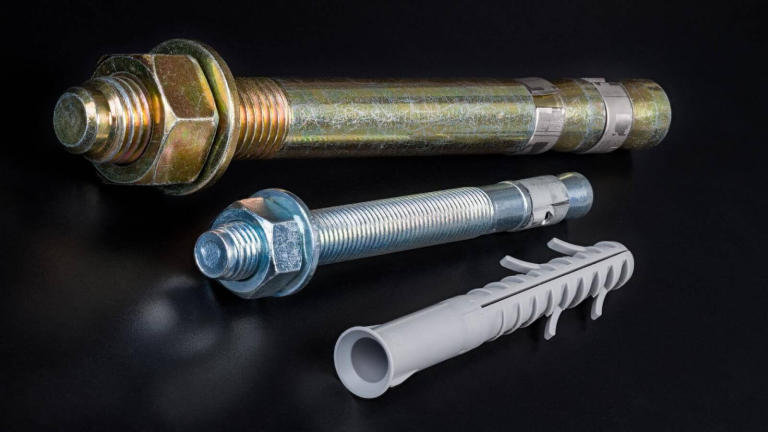
Definition of Anchor Fixings
Anchor fixings are mechanical fasteners that grip to a solid material such as concrete walls, floors, and ceilings. They are generally used to secure heavy machinery, equipment, and fixtures to a concrete surface.
Reasons for Anchor Fixing Removal
Several reasons could necessitate anchor fixing removal, which could include:
- The equipment has been relocated or no longer needed.
- The anchor fixing is not installed correctly.
- The anchor fixing is damaged
Preparation for Anchor Fixing Removal
Before attempting to remove anchor fixings, ensure the necessary safety measures are observed. This includes wearing protective gear such as goggles, gloves, and a hardhat. Also, ensure the working area is safe, and any hazards are removed.
The next step involves obtaining the appropriate tools and equipment necessary for anchor fixing removal. The most common tools required include a wrench, hammer, power drill, and lubricating oil.
Methods of Anchor Fixing Removal
There are several methods of anchor fixing removal, including:
Unscrewing
Unscrewing the fixing involves turning the nut counterclockwise to remove the anchor from the concrete surface. This method is the easiest to use and is best for removing anchors that are not rusted or corroded.
Hammering
Hammering involves using a hammer to loosen the fixing from the concrete surface gently. This method is ideal for removing anchors that require a little more force to come out.
Drilling
If the fixing is still stuck, drilling through the center of the fixing will loosen it from the concrete surface, and it can be easily removed. This method is ideal for removing a fixing that is rusted or corroded.
How to Remove Anchor Fixings – Step-by-step Guide
Step 1: Evaluate the Anchor Fixing
Determine the best removal method for the anchor fixing based on its condition. If the fixing is rusted or corroded, consider using a drilling method.
Step 2: Apply Penetrating Oil
Apply penetrating oil to the nut to help loosen the fixing. Allow the oil to sit for several minutes.
Step 3: Unscrew the Fixing
Using a wrench, turn the nut counterclockwise to remove the anchor from the concrete surface. If the fixing is still stuck, continue to hammer the fixing gently while turning.
Step 4: Hammering
If the fixing is still stuck, using a hammer to gently loosen the fixing while turning.
Step 5: Drilling
If the fixing still doesn’t come out, use a power drill to drill down the center of the fixing to loosen it from the concrete surface.
Step 6: Clean up the Area
After removing the fixing, ensure the work area is free from any debris.
To read more about this topic, check out previous blog post at Sleeve Anchor Removal: How to Do It Right
For more general information on building then please visit: https://www.building.vic.gov.au/
Removing anchor fixings from a concrete surface requires the right tools, techniques, and safety measures to avoid potential hazards. Always take the time to evaluate the fixing’s condition, apply penetrating oil, unscrew, hammer, or drill depending on the fixing’s condition. Take the necessary safety measures such as wearing protective gear and ensuring the working environment is safe and free from hazards.